Knowledge Base Article
Sending Emails Related To Campaigns
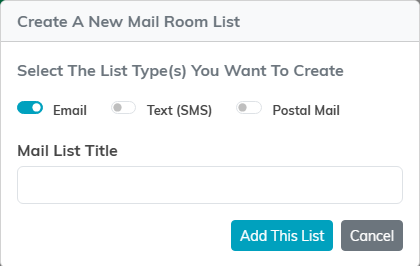
- Email List - For an email list, you will place a checkmark in this box. One list type is required from this section.
- US Mail List - For a mailed list, you will place a checkmark in this box. You can create the same list for multiple types by placing checkmarks in one, two, or all types.
- Text List - For a text messaging list, you will place a checkmark in this box.
- Mail List Title - Enter a name for your list. This is a required field.
- Department - If this list belongs to a specific department within your organization or you wish to restrict users by department, select the appropriate department from the drop-down list. If you have users in your system who are restricted by department, they will only be able to see records in the departments you have granted them access to.
- District - If this list belongs to a specific district within your organization or you wish to restrict users by district, select the appropriate district from the drop-down list. If you have users in your system who are restricted by district, they will only be able to see records in the districts you have granted them access to.
- Precinct - If this list belongs to a specific precinct within our organization or you wish to restrict users by precinct, select the appropriate precinct from the drop-down list. If you have users in your system who are restricted by precinct, they will only be able to see records in the precincts you have granted them access to.
Remember to remind your constituents to white list argentasoftware.com and argentamail.com so emails from your organization don't get stuck in their spam filters.
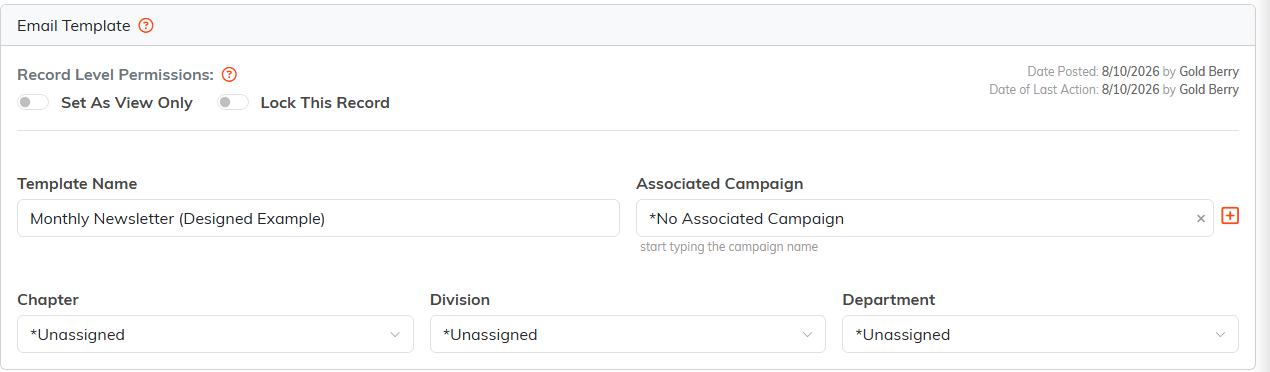
- Record Level Permissions - Set As View Only - Placing a checkmark in this box restricts this record to view-only access unless the user is the user who created the record, the user is a master admin, or the user is given specific permission to modify this record on the Record Permissions tab of this record. Permissions also work by assigning a department, district and/or precinct. If you have users in your system who are restricted by these permissions, they will only be able to see records in the departments/districts/precincts you have granted them access to.
- Record Level Permissions - Lock This Record - Placing a checkmark in this box locks this record so that users cannot view or update the record unless the user is the user who created the record, the user is a master admin, or the user is given specific permission to access this record on the Record Permissions tab of this record. Permissions also work by assigning a department, district and/or precinct. If you have users in your system who are restricted by these permissions, they will only be able to see records in the departments/districts/precincts you have granted them access to.
- Template Name - Enter a name for the template here.
- Associated Campaign - If this template belongs to a specific campaign, select the campaign it belongs to by clicking the Lookup icon. Or if you need to create a new campaign you can do so by clicking the Add New icon.
- Chapter - If this template belongs to a specific chapter within your organization or you wish to restrict users by chapter, select the appropriate chapter from the drop-down list. If you have users in your system who are restricted by chapter, they will only be able to see records in the chapters you have granted them access to.
- Division - If this template belongs to a specific division within your organization or you wish to restrict users by division, select the appropriate division from the drop-down list. If you have users in your system who are restricted by division, they will only be able to see records in the divisions you have granted them access to.
- Department - If this template belongs to a specific department within your organization or you wish to restrict users by department, select the appropriate department from the drop-down list. If you have users in your system who are restricted by department, they will only be able to see records in the departments you have granted them access to.
- District - If this template belongs to a specific district within your organization or you wish to restrict users by district, select the appropriate district from the drop-down list. If you have users in your system who are restricted by district, they will only be able to see records in the districts you have granted them access to.
- Precinct - If this template belongs to a specific precinct within our organization or you wish to restrict users by precinct, select the appropriate precinct from the drop-down list. If you have users in your system who are restricted by precinct, they will only be able to see records in the precincts you have granted them access to.
- Send A Test Email - Use this button to send a test email. Once you click the button, the Select A Constituent screen will open for you to search for and select a test recipient to receive this test email. This would typically be yourself or some other member of your team. This is a great way to view the email, proofread it, and ensure its completeness before sending to your guests. With a recipient selected, click the "Let's Do This!" button to send the email.
- Send Email To A Single Recipient - If you would like to send this email to a single recipient, use this button. This will open the Select A Constituent screen where you will search for and select the recipient that you wish to send your email to. With a recipient selected, click the "Let's Do This!" button to send the email.
- Send Email To A Mail Room List - Once you are ready to send your email to all your guests, you will click this button. Clicking this button opens the Schedule Email window:
From here you can select the exact date and time you want the email sent. Use the calendar selector to select the date and the time selector to set the time. Next, you will select the Mail Room list you wish to send this email to. Type in a full or partial name of the list and click enter or the Search icon to search for and select your list. With this information entered, click the "Let's Do This!" button, and your email will be scheduled to be sent at the date and time you selected. - From Email Address - If you have validated your email address with us, the email address you enter here will be shown as the from address when the recipient receives the email. If you haven't validated your email address with us, the email will be sent from [email protected] and your email will be used as the reply to email address. For more information on how to validate your email address, please see our other KB Article - Validating An Email Address.
- Copy All Selected Team Members - Use this drop-down box to select the team members that you would like copied on the email. You can select one team member or many. Place a checkmark in the corresponding box for all members you want copied on the email.
- Include A Greeting - Place a checkmark in this box if you wish to use a greeting for your email.
- Greeting - If you placed a checkmark in the above box, set your greeting here. This could be: Welcome, Hello, Good Day, etc. This will be displayed at the top of your email followed by the field you select below. ex: Hello Jane, for first name or Hello Jane Doe for full name, etc.
- Field - Select the field to be followed by the greeting. Your options are: First Name, Full Name, Prefix and Last Name.
- Subject - Enter a subject for your email. This will be the subject line that your recipients see when the email is delivered. Ex. Welcome to Our Event, Change of Location for Event, etc.
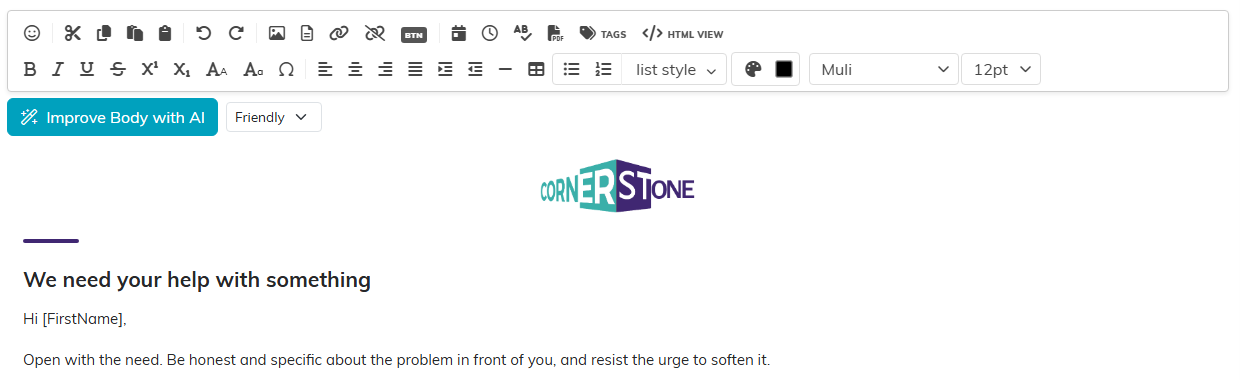
- Edit Email Body - To edit the body of the email or create the body of the email, click this button. This opens the body of the email for you to edit or create your message:
This tab controls the record permissions for the template.
View Only Access:
Sometimes you want users to be able to view a record but block them from modifying that record. Individual records can be set to View Only so only master admins and users who are listed here, can edit them. To grant users permission to modify this record simply add them here. Select a user from the Add User box (start typing the user's name) then click the Add button to add the user to the view-only access permissions.
Locked Record Access:
Individual records can be locked so only master admins and users who are listed here can view or edit them. To grant users permission for this record simply add them here. Select a user from the Add User box (start typing the user's name), then click the Add button to add a user to the locked record access permissions.
Remember to remind your constituents to white list argentasoftware.com and argentamail.com so emails from your organization don't get stuck in their spam filters.
- Record Level Permissions - Set As View Only - Placing a checkmark in this box restricts this record to view-only access unless the user is the user who created the record, the user is a master admin, or the user is given specific permission to modify this record on the Record Permissions tab of this record. Permissions also work by assigning a department, district and/or precinct. If you have users in your system who are restricted by these permissions, they will only be able to see records in the departments/districts/precincts you have granted them access to.
- Record Level Permissions - Lock This Record - Placing a checkmark in this box locks this record so that users cannot view or update the record unless the user is the user who created the record, the user is a master admin, or the user is given specific permission to access this record on the Record Permissions tab of this record. Permissions also work by assigning a department, district and/or precinct. If you have users in your system who are restricted by these permissions, they will only be able to see records in the departments/districts/precincts you have granted them access to.
- Template Name - Enter a name for the template here.
- Associated Campaign - If this template belongs to a specific campaign, select the campaign it belongs to by clicking the Lookup icon. Or if you need to create a new campaign you can do so by clicking the Add New icon.
- Chapter - If this template belongs to a specific chapter within your organization or you wish to restrict users by chapter, select the appropriate chapter from the drop-down list. If you have users in your system who are restricted by chapter, they will only be able to see records in the chapters you have granted them access to.
- Division - If this template belongs to a specific division within your organization or you wish to restrict users by division, select the appropriate division from the drop-down list. If you have users in your system who are restricted by division, they will only be able to see records in the divisions you have granted them access to.
- Department - If this template belongs to a specific department within your organization or you wish to restrict users by department, select the appropriate department from the drop-down list. If you have users in your system who are restricted by department, they will only be able to see records in the departments you have granted them access to.
- District - If this template belongs to a specific district within your organization or you wish to restrict users by district, select the appropriate district from the drop-down list. If you have users in your system who are restricted by district, they will only be able to see records in the districts you have granted them access to.
- Precinct - If this template belongs to a specific precinct within our organization or you wish to restrict users by precinct, select the appropriate precinct from the drop-down list. If you have users in your system who are restricted by precinct, they will only be able to see records in the precincts you have granted them access to.
- Send A Test Email - Use this button to send a test email. Once you click the button, the Select A Constituent screen will open for you to search for and select a test recipient to receive this test email. This would typically be yourself or some other member of your team. This is a great way to view the email, proofread it, and ensure its completeness before sending to your guests. With a recipient selected, click the "Let's Do This!" button to send the email.
- Send Email To A Single Recipient - If you would like to send this email to a single recipient, use this button. This will open the Select A Constituent screen where you will search for and select the recipient that you wish to send your email to. With a recipient selected, click the "Let's Do This!" button to send the email.
- Send Email To A Mail Room List - Once you are ready to send your email to all your constituents, you will click this button. Clicking this button opens the Schedule Email window:
From here you can select the exact date and time you want the email sent. Use the calendar selector to select the date and the time selector to set the time. Next, you will select the Mail Room list you wish to send this email to. Type in a full or partial name of the list and click enter or the Search icon to search for and select your list. With this information entered, click the "Let's Do This!" button, and your email will be scheduled to be sent at the date and time you selected. - From Email Address - If you have validated your email address with us, the email address you enter here will be shown as the from address when the recipient receives the email. If you haven't validated your email address with us, the email will be sent from [email protected] and your email will be used as the reply to email address. For more information on how to validate your email address, please see our other KB Article - Validating An Email Address.
- Copy All Selected Team Members - Use this drop-down box to select the team members that you would like copied on the email. You can select one team member or many. Place a checkmark in the corresponding box for all members you want copied on the email.
- Include A Greeting - Place a checkmark in this box if you wish to use a greeting for your email.
- Greeting - If you placed a checkmark in the above box, set your greeting here. This could be: Welcome, Hello, Good Day, etc. This will be displayed at the top of your email followed by the field you select below. ex: Hello Jane, for first name or Hello Jane Doe for full name, etc.
- Field - Select the field to be followed by the greeting. Your options are: First Name, Full Name, Prefix and Last Name.
- Subject - Enter a subject for your email. This will be the subject line that your recipients see when the email is delivered. Ex. Welcome to Our Campaign, We Need Your Help Reaching Our Goal, etc.
- Edit Email Body - To edit the body of the email or create the body of the email, click this button. This opens the body of the email for you to edit or create your message:
This tab controls the record permissions for the template.
3. C. 1. View Only Access:
Sometimes you want users to be able to view a record but block them from modifying that record. Individual records can be set to View Only so only master admins and users who are listed here, can edit them. To grant users permission to modify this record simply add them here. Select a user from the Add User box (start typing the user's name) then click the Add button to add the user to the view-only access permissions.
3. C. 2. Locked Record Access:
Individual records can be locked so only master admins and users who are listed here can view or edit them. To grant users permission for this record simply add them here. Select a user from the Add User box (start typing the user's name), then click the Add button to add a user to the locked record access permissions.