Knowledge Base Article
Add Delegates
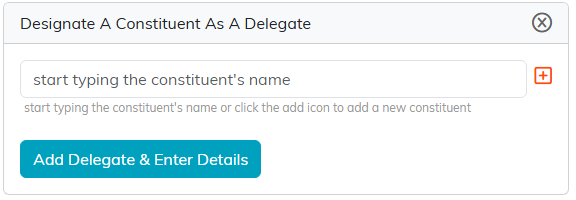
- Constituent ID - From here you will search for a constituent that is already listed in your system, to designate them as a Delegate. If your constituent is not listed you may add them by selecting the Add New icon. For help adding a new constituent please refer to the KB Article - Add Constituents. This is a required field.
- Term Start Date - Enter the delegates term start date. You can manually type in the start date or use the calendar selector.
- Term End Date -Enter the delegates term end date. You can manually type in the end date or use the calendar selector.
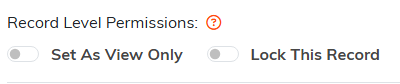
- Record Permissions- Set As View Only - Placing a checkmark in this box restricts this record to view-only access unless the user is the user who created the record, the user is a master admin, or the user is given specific permission to modify this record on the Record Permissions tab of this record. Permissions also work by assigning a department, district and/or precinct. If you have users in your system who are restricted by these permissions, they will only be able to see records in the departments/districts/precincts you have granted them access to.
- Record Permissions - Lock This Record - Placing a checkmark in this box locks this record so that users cannot view or update the record unless the user is the user who created the record, the user is a master admin, or the user is given specific permission to access this record on the Record Permissions tab of this record. Permissions also work by assigning a department, district and/or precinct. If you have users in your system who are restricted by these permissions, they will only be able to see records in the departments/districts/precincts you have granted them access to.
- Open The Full Constituent Card - By clicking this button you will be taken to the full constituent card where you can add/edit details of this constituent's phone numbers, addresses, and other information.
- Delegate Status - Choose a status from the drop-down list. Your Options are: Active, Inactive, and In Process.
- Delegate Number - If you use delegate numbers, please enter the number here.
- Preferred Payment Method - You may set this delegate's preferred payment method by selecting one from the drop-down list.
- Delegate Type - Select the delegate type from the drop-down list. If an applicable type is not listed you can add a new one by selecting the Add New icon.
- Delegate Category - Select the delegate category from the drop-down list. If an applicable category is not listed you can add a new one by selecting the Add New icon.
- Delegate Level - Select the delegate level from the drop-down list. If an applicable level is not listed you can add a new one by selecting the Add New icon.
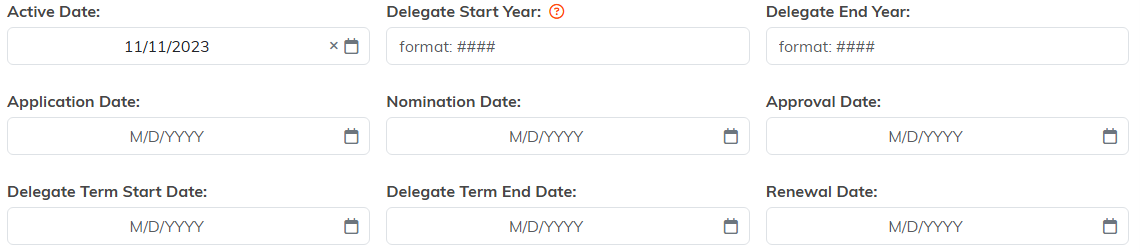
- Active Date - By default, this will show the day you are entering the record. You can select another active date by manually typing in a date or by using the date selector.
- Delegate Start Year - Enter the delegate's start year here. You can manually type in a date or use the calendar selector.
- Delegate End Year - Enter the delegate's end year here. You can manually type in a date or use the calendar selector.
- Application Date - Enter the application date here. You can manually type in a date or use the calendar selector.
- Nomination Date - Enter a nomination date here. You can manually type in a date or use the calendar selector.
- Approval Date - Enter an approval date here. You can manually type in a date or use the calendar selector.
- Delegate Term Start Date - Enter the delegate's term start date here. You can manually type in a date or use the calendar selector.
- Delegate Term End Date - Enter the delegate's term end date here. You can manually type in a date or use the calendar selector.
- Renewal Date - Enter a renewal date here. You can manually type in a date or use the calendar selector.
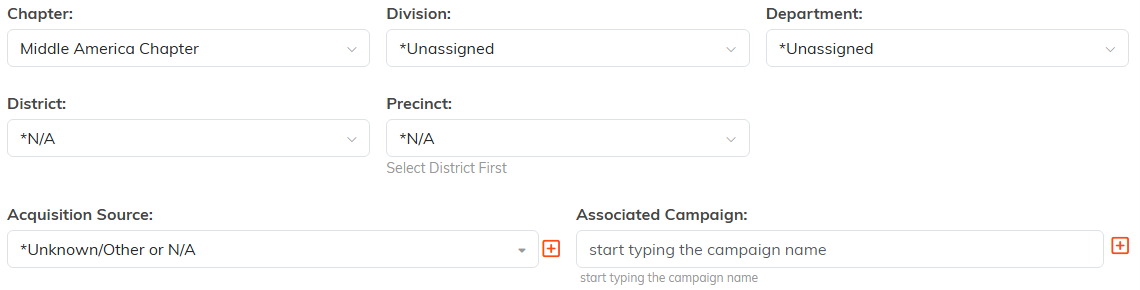
- Chapter - If this delegate is associated with a chapter within your organization, select it from the drop-down list.
- Division - If this delegate is associated with a division within your organization, select it from the drop-down list.
- Department - If this delegate is associated with a department within your organization, select it from the drop-down list.
- District - If this delegate needs to be associated with a specific district, select it from the drop-down list.
- Precinct - If this delegate needs to be associated with a specific precinct, select it from the drop-down list.
- Acquisition Source - Select the acquisition source for your delegate from the drop-down list. If an appropriate source is not listed click the Add New icon to add a new source.
- Associated Campaign - If the delegate is associated with a campaign, select it from the drop-down list. If an appropriate campaign is not listed click the Add New icon to add a new campaign.
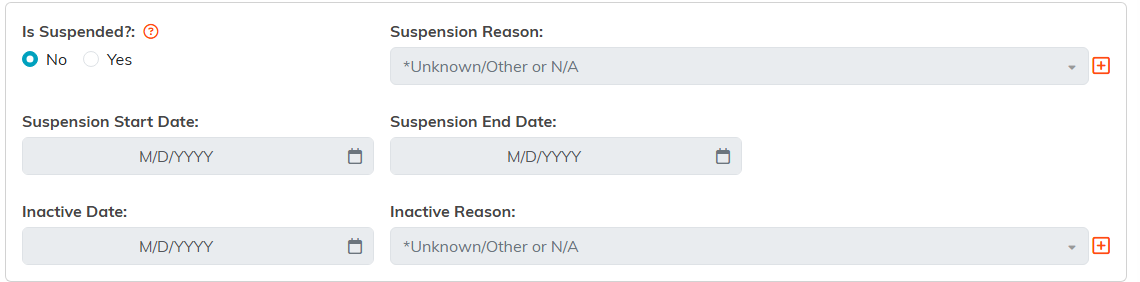
- Is Suspended? - If this delegate is suspended select "Yes" if they are not, leave it as "No."
- Suspension Reason - If your delegate is suspended, you can enter the reason here.
- Suspension Start Date - If your delegate is suspended, enter the suspension start date here. You can manually type in a date or use the calendar selector.
- Suspension End Date - If your delegate is suspended, enter the suspension end date here. You can manually type in a date or use the calendar selector.
- Inactive Date - If the delegate is set to "Inactive" in the delegate status field above, you can set the inactive date for the delegate here. You can manually type in a date or use the date selector. This is a required field if your delegate is inactive.
- Inactive Reason - If the delegate is inactive you can select a reason from the drop-down list. If an appropriate reason is not listed you can add a new one by clicking the Add New icon.
- Team Member - By default, this will say the user that is signed into Argenta. You can select another user from the drop-down list if needed. This is a required field.
- Follow-up Reason - Enter the reason for the follow-up meeting. This is a required field.
- Follow-up Outcome - Once the follow-up has occurred you will enter the details and/or outcome here.
- Follow-up Date & Time - Enter a date and time for the follow-up meeting. You can manually enter a date and time or use the calendar and time selectors. This will be entered onto your personal calendar. This is a required field.
- Notification Date & Time - If you would like to set a notification for yourself, enter a date and time here. You can manually enter a date and time or use the calendar and time selectors. Setting a notification here sets up the date and time that an email reminder will be sent to you for the purpose of reminding you of this follow-up appointment.
- Send A Notification to 2nd Email Address - If you would like to send the notification email to someone else, you can enter another email address here that will also receive your notification email.
This tab controls the record permissions for the delegate.
8. A. View Only Access:
Sometimes you want users to be able to view a record but block them from modifying that record. Individual records can be set to View Only so only master admins and users who are listed here, can edit them. To grant users permission to modify this record simply add them here. Select a user from the Add User box (start typing the user's name) then click the Add button to add the user to the view-only access permissions.
8. B. Locked Record Access:
Individual records can be locked so only master admins and users who are listed here can view or edit them. To grant users permissions for this record simply add them here. Select a user from the Add User box (start typing the user's name), then click the Add button to add a user to the locked record access permissions.