Knowledge Base Article
How to Create and Manage Email Lists in the Mail Room
A Mail Room list is the group of people you send to. Build one once, then reuse it every time you email, text, or mail that audience.
Create A List
- Go to Communication > Manage Mailing Lists.
- Click Add A New List.
- In the Add A New Mail Room List window, switch on the list type you need: Email, Text (SMS), or Postal Mail. You can switch on more than one, and Argenta creates a list of each type you picked.
- Type a Mail List Title. Make it specific, something like "Newsletter Subscribers" or "2026 Gala Attendees".
- Click Add This List.

Manage Mailing Lists, with Add A New List.
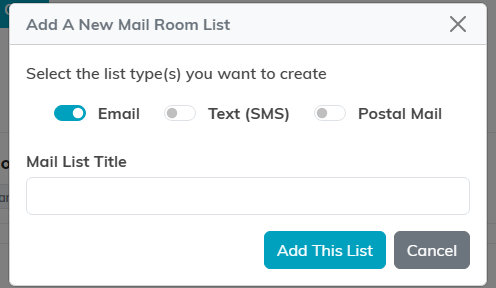
Switch on the list types you need, name it, then Add This List.
Add People To It
Two routes, depending on whether you are adding a few people or a whole segment.
One at a time, from the list:
- Open the list from Manage Mailing Lists.
- Click Add A Constituent.
- Search for the person and add them.

Inside a list, Add A Constituent adds one person at a time.
In bulk, from a grid:
- Go to Constituents (or Donors, Volunteers, Members, or another module) and filter to the people you want.
- Select the records with the checkboxes.
- Open the bulk actions menu and choose Create A New Mailroom List With Selected Records, or Add Selected Records To An Existing Mailroom List.
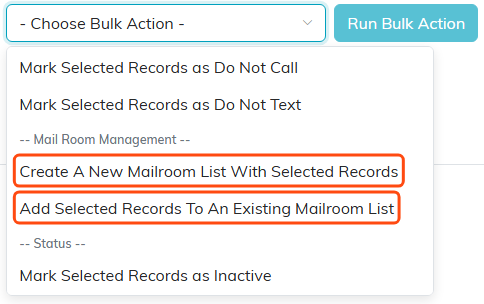
Both mail room options sit under Mail Room Management in the bulk actions menu.
Work With An Existing List
Each row on Manage Mailing Lists has a set of actions:
- Open List: view and edit the members.
- Turn this into a Smart List: on email lists, the wand icon converts the list to a rule-driven Smart List that keeps its own membership up to date. On a list that is already smart, the same icon edits the rule.
- Copy List: duplicate it as a starting point for a new audience.
- Delete List: remove it.

1 Open List, 2 Turn this into a Smart List, 3 Copy List, 4 Delete List.
Inside a list you also get Export List to pull the members to a spreadsheet, a switch to Include "No Solicit" Constituents In List, and bulk actions to Add Engagement for Selected Constituents or Remove All Selected Constituents from List.

Export List, and the switch that pulls No Solicit people back into view.
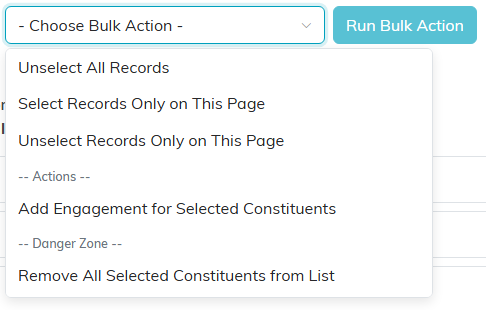
The bulk actions available inside a list.
Why Your Send Count Is Lower Than Your List Count
An email list can hold more people than it will actually reach, and that gap is deliberate. Every email list shows you its own breakdown right on the row:
- Subscribed: will receive marketing email.
- Unsubscribed: withdrew marketing consent, by their own unsubscribe click or by the Do Not Solicit flag.
- Cleaned: the address is dead, from a hard bounce, a spam complaint, or a suppression.
- Unreachable: flagged Do Not Email, or marked deceased on the constituent record.
A count only appears when it is above zero, so a healthy list often shows nothing but a subscribed number. Those breakdown numbers use the same rules the sender uses, so what you see on the list matches what actually happens when you send.

This list holds 29 people and reaches 22. The seven cleaned addresses are dead.
Send To The List
Go to Communication > Mail Room, write your message or pick a template, then choose your list as the recipients and send. To send from a saved template instead, open the template and use Send To A Mail Room List.

On Send Email, pick your audience with Send To A Mail Room List.
Keeping Lists Healthy
- Name lists so someone else on your team can tell what they are without opening them.
- Let Smart Lists do the upkeep for audiences defined by a rule instead of re-adding people by hand.
- Check the Cleaned count now and then. Repeatedly mailing dead addresses hurts your sender reputation.
- Build separate lists for separate purposes rather than one giant list you filter every time.
